Houdini 22 introduces a more direct way to build and submit multiple Karma render passes from one Solaris network. Each pass can use its own Karma render settings, output path, object visibility, and image filters. One USD stage now describes multiple render recipes, living side by side in the same scene graph.
This is powerful. It is also exactly the kind of feature that breaks traditional render farm pipelines, because a single ROP no longer means a single render.
We rebuilt our pipeline tools so it does not break ours. Drop & Render is the first render farm in the world with native support for USD render passes. You set up your passes the way SideFX designed them, connect your scene, and every pass becomes its own farm job. Automatically.
This article walks through one complete example, step by step. It is not the only way to use RenderPass prims, but it shows every part of the workflow you need.
Example goal: Render the same image twice through one USD Render ROP. The first pass applies an image filter authored by the new Image Filter LOP in Houdini 22. The second pass renders without applying that filter. Each version writes to its own output file, and both are included in the same Drop & Render submission.
What changed in Houdini 22
In previous Houdini versions, the Karma Setup tool created a Karma Render Settings LOP and a USD Render ROP. Houdini 22 now adds a Render Pass LOP between them.
To create the setup, open the Tab menu inside Solaris and choose Karma Setup.
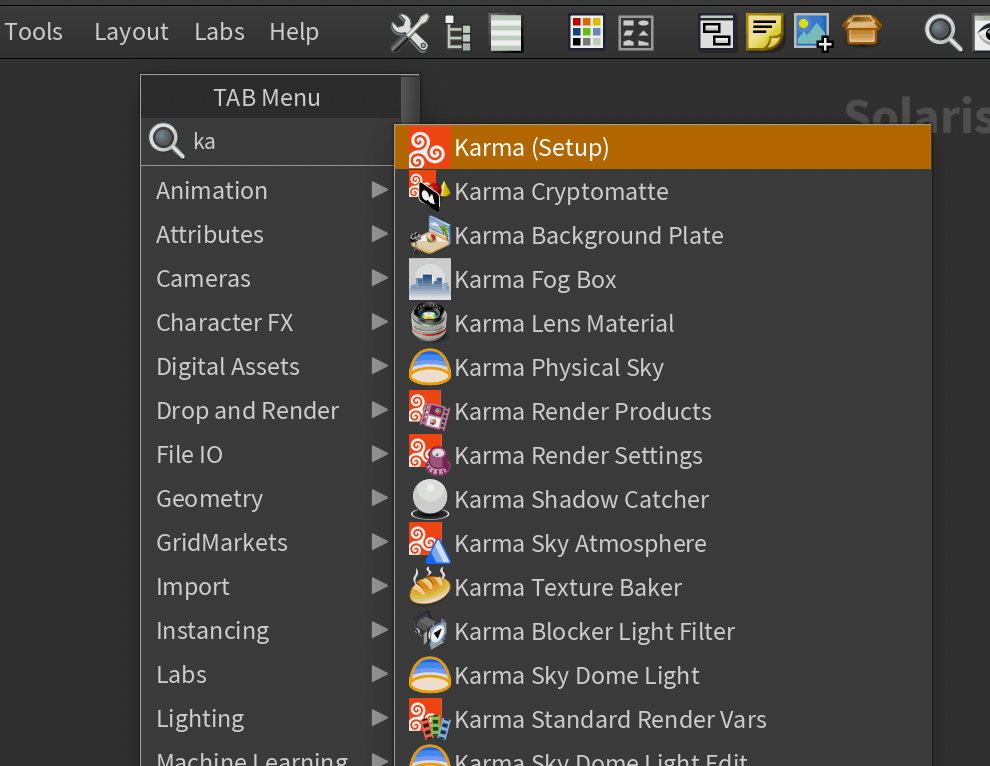
The resulting network contains:
- A Karma Render Settings LOP
- A Render Pass LOP
- A USD Render ROP
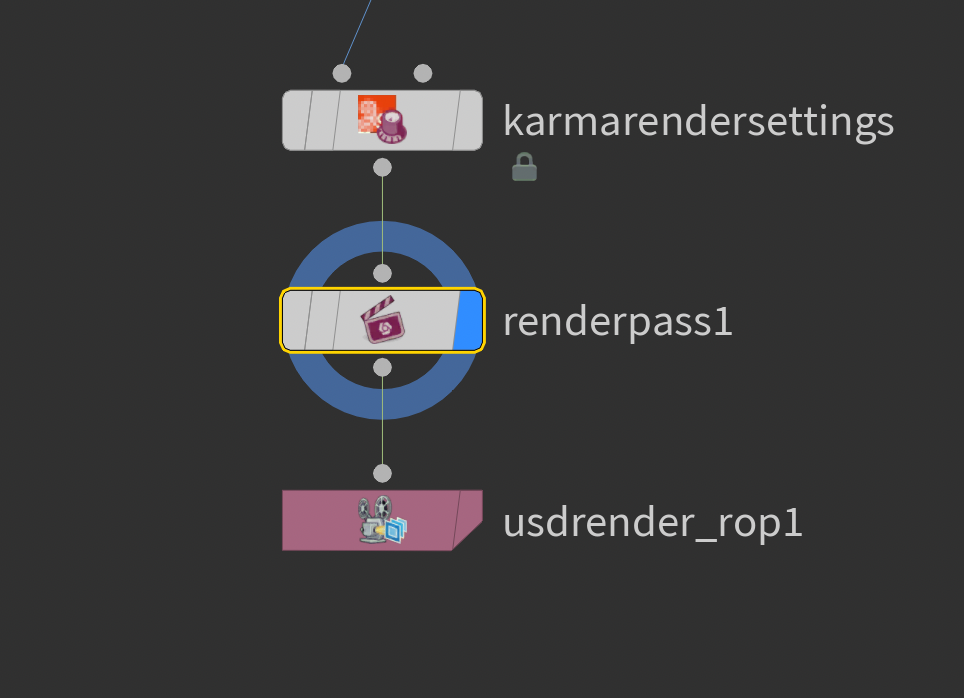
The Render Pass LOP creates or edits a UsdRenderPass prim. Instead of baking several versions of the scene, each prim stores a recipe that tells Karma which Render Settings prim to use and which objects should participate in that pass.
The node first appeared in Houdini 21.0. What changes in Houdini 22 is that Karma Setup creates it automatically and the USD Render ROP can render several RenderPass prims through the new workflow. Drop & Render can now turn those prims into separate farm jobs.
SideFX explains the underlying system in its Render Pass LOP documentation and Houdini 22 Solaris notes.
Render passes are different from AOVs
An AOV separates information produced by one render, such as diffuse, reflection, depth, or motion data.
A Render Pass changes the recipe used to produce a render. It can point to different Karma settings, use a different output path, apply an image filter authored by an Image Filter LOP, or change how objects participate in the image. Each Render Pass can still produce its own AOVs.
Why this matters if you render on a farm
If you run lighting or lookdev at any scale, you have felt this problem before. Separate passes used to mean separate ROPs, separate output paths to maintain, and separate submissions to keep track of. Render passes collapse all of that into scene description, which is exactly where USD wants it.
The catch is the farm. Husk renders the passes of a single invocation one after another, on one machine. Fine on a workstation, wasteful on a farm. And a farm that only sees "one ROP" will submit one job, render every pass into it, and let the outputs fight over filenames.
That is the part we solved. Every matched pass becomes its own job, so a four pass shot is four machines doing one render each instead of one machine doing four.
Example setup: render with and without an image filter
The goal of this example is to produce two versions of the same image from one USD Render ROP:
renderpass1is configured to apply the image filter authored byimagefilter1renderpass2is configured without that image filter
The complete Solaris chain contains two Karma Render Settings LOPs and two Render Pass LOPs:
imagefilter1
    |
karmarendersettings
    |
renderpass1
    |
karmarendersettings1
    |
renderpass2
The nodes are chained so that all settings and pass prims are authored on the same USD stage.
Step 1: Configure the Image Filter LOP and first Karma Render Settings LOP
The Image Filter LOP is new in Houdini 22. It authors an image filter list as a prim on the USD stage. In this example, imagefilter1 is connected before the first Karma Render Settings LOP.
The first Karma Render Settings LOP keeps its default node name, karmarendersettings.
Its Render Settings Prim parameter uses:
/Render/$OS$OS resolves to the name of the current node. This means the first settings prim becomes:
/Render/karmarendersettingsIn this example, Output Picture is set to:
$HIP/render/CharacterWithFilter.exrOpen Image Output, then open the Filters tab. The parameter interface labels this area COP Image Filter Lists, but the node used in this workflow is the Image Filter LOP. Add one entry and set its Filter Prim to the prim created by imagefilter1:
/Render/ImageFilter/imagefilter1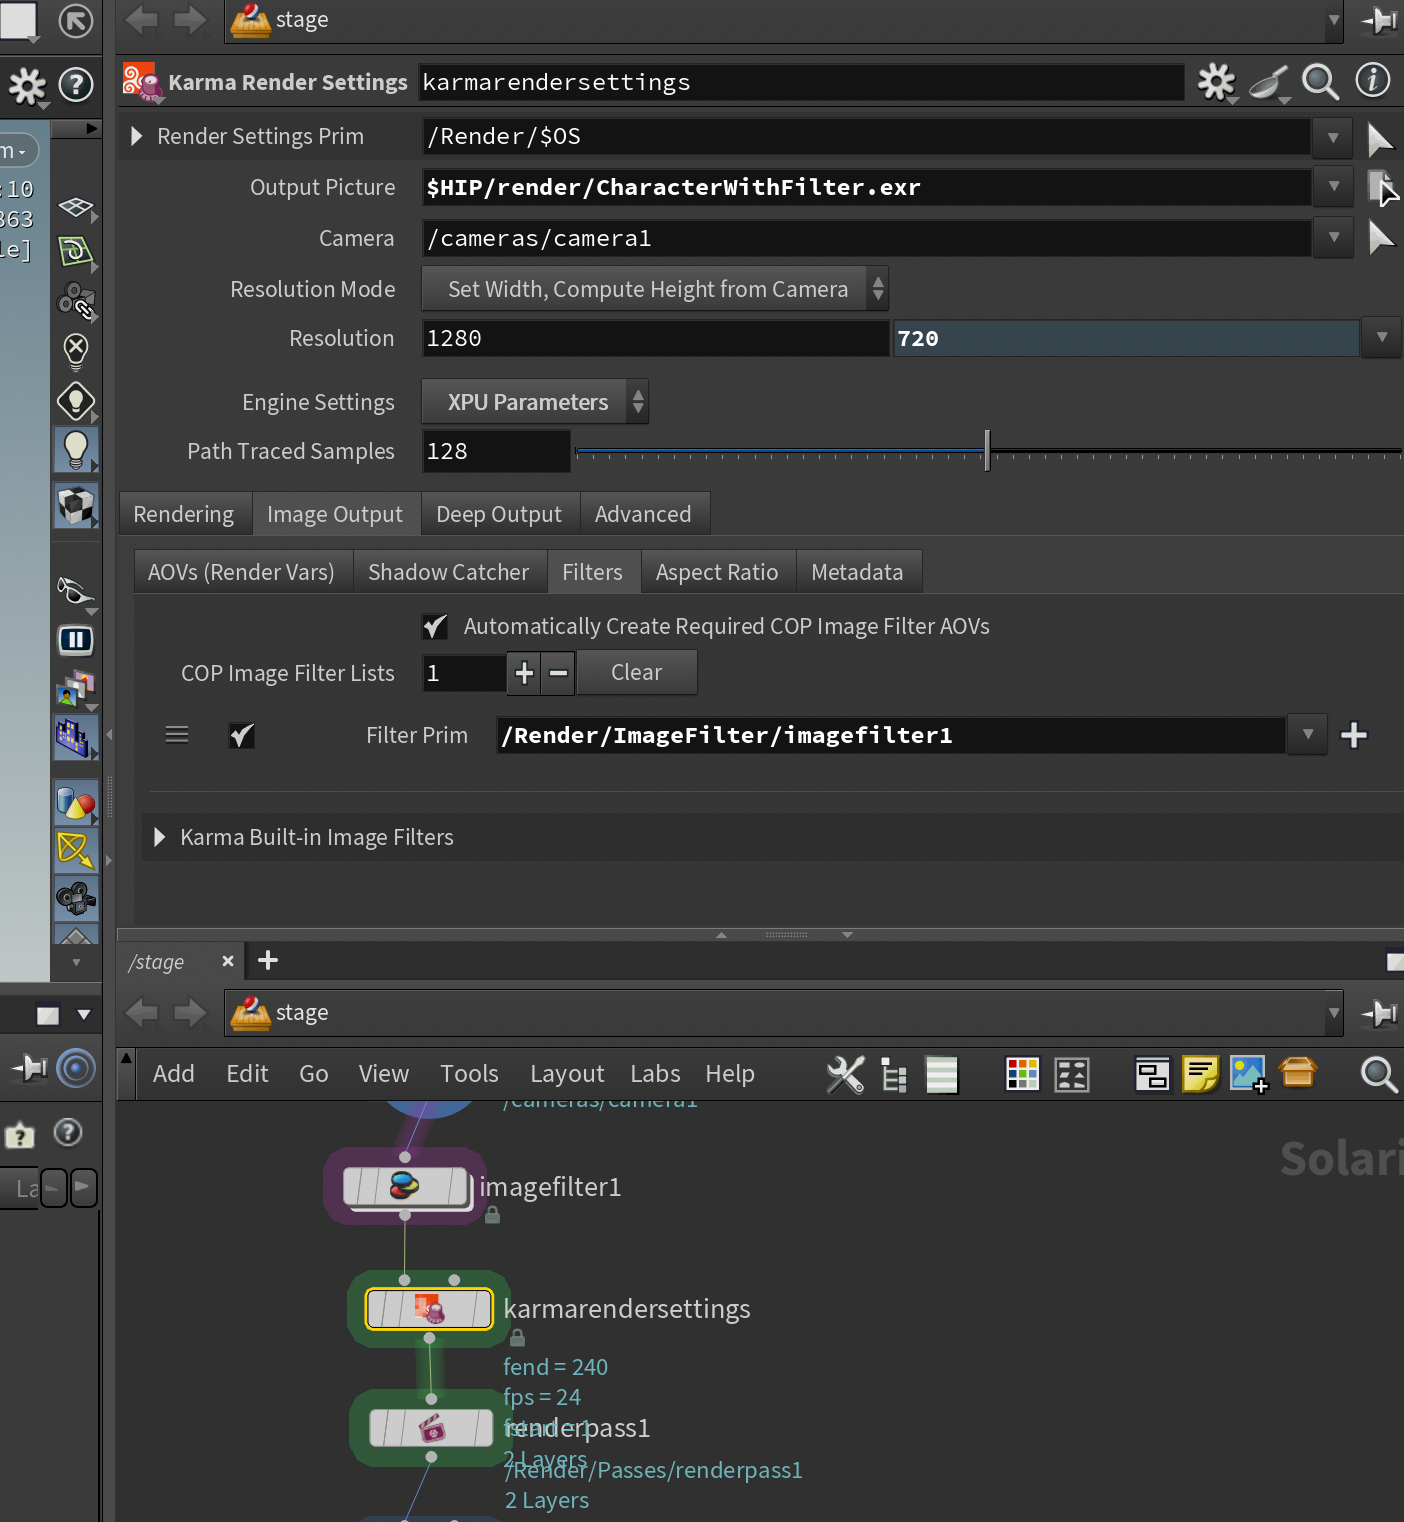
This pass uses Karma XPU parameters at 128 path traced samples in the example scene.
Step 2: Point the first Render Pass LOP to its settings
Select renderpass1 and find the Render Source parameter. Set it to:
/Render/karmarendersettings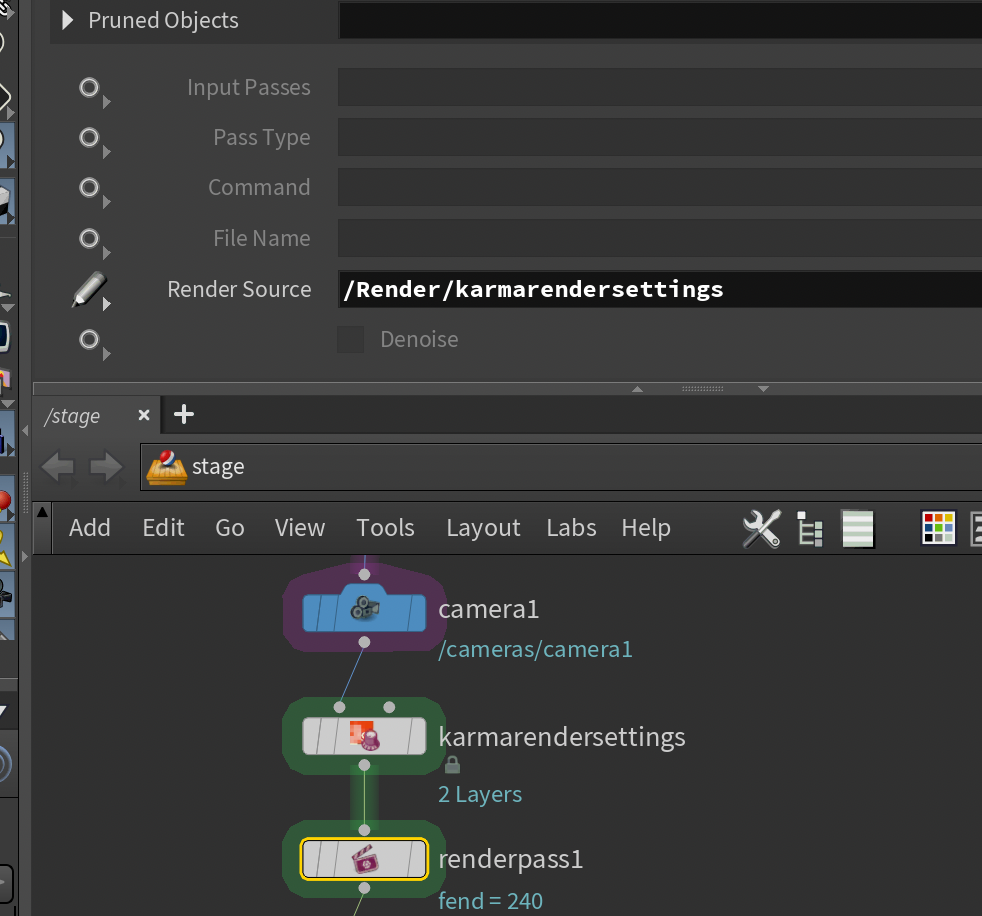
The Render Pass LOP authors this pass at:
/Render/Passes/renderpass1This path is what the USD Render ROP and Drop & Render use to identify the pass.
Step 3: Add the second settings and pass nodes
Place another Karma Render Settings LOP after renderpass1. Houdini names it karmarendersettings1.
Because its Render Settings Prim still uses /Render/$OS, it automatically creates a separate prim:
/Render/karmarendersettings1Set its Output Picture to a different file:
$HIP/render/Character_WithoutFilter.exrLeave the Filter Prim field empty for this version.
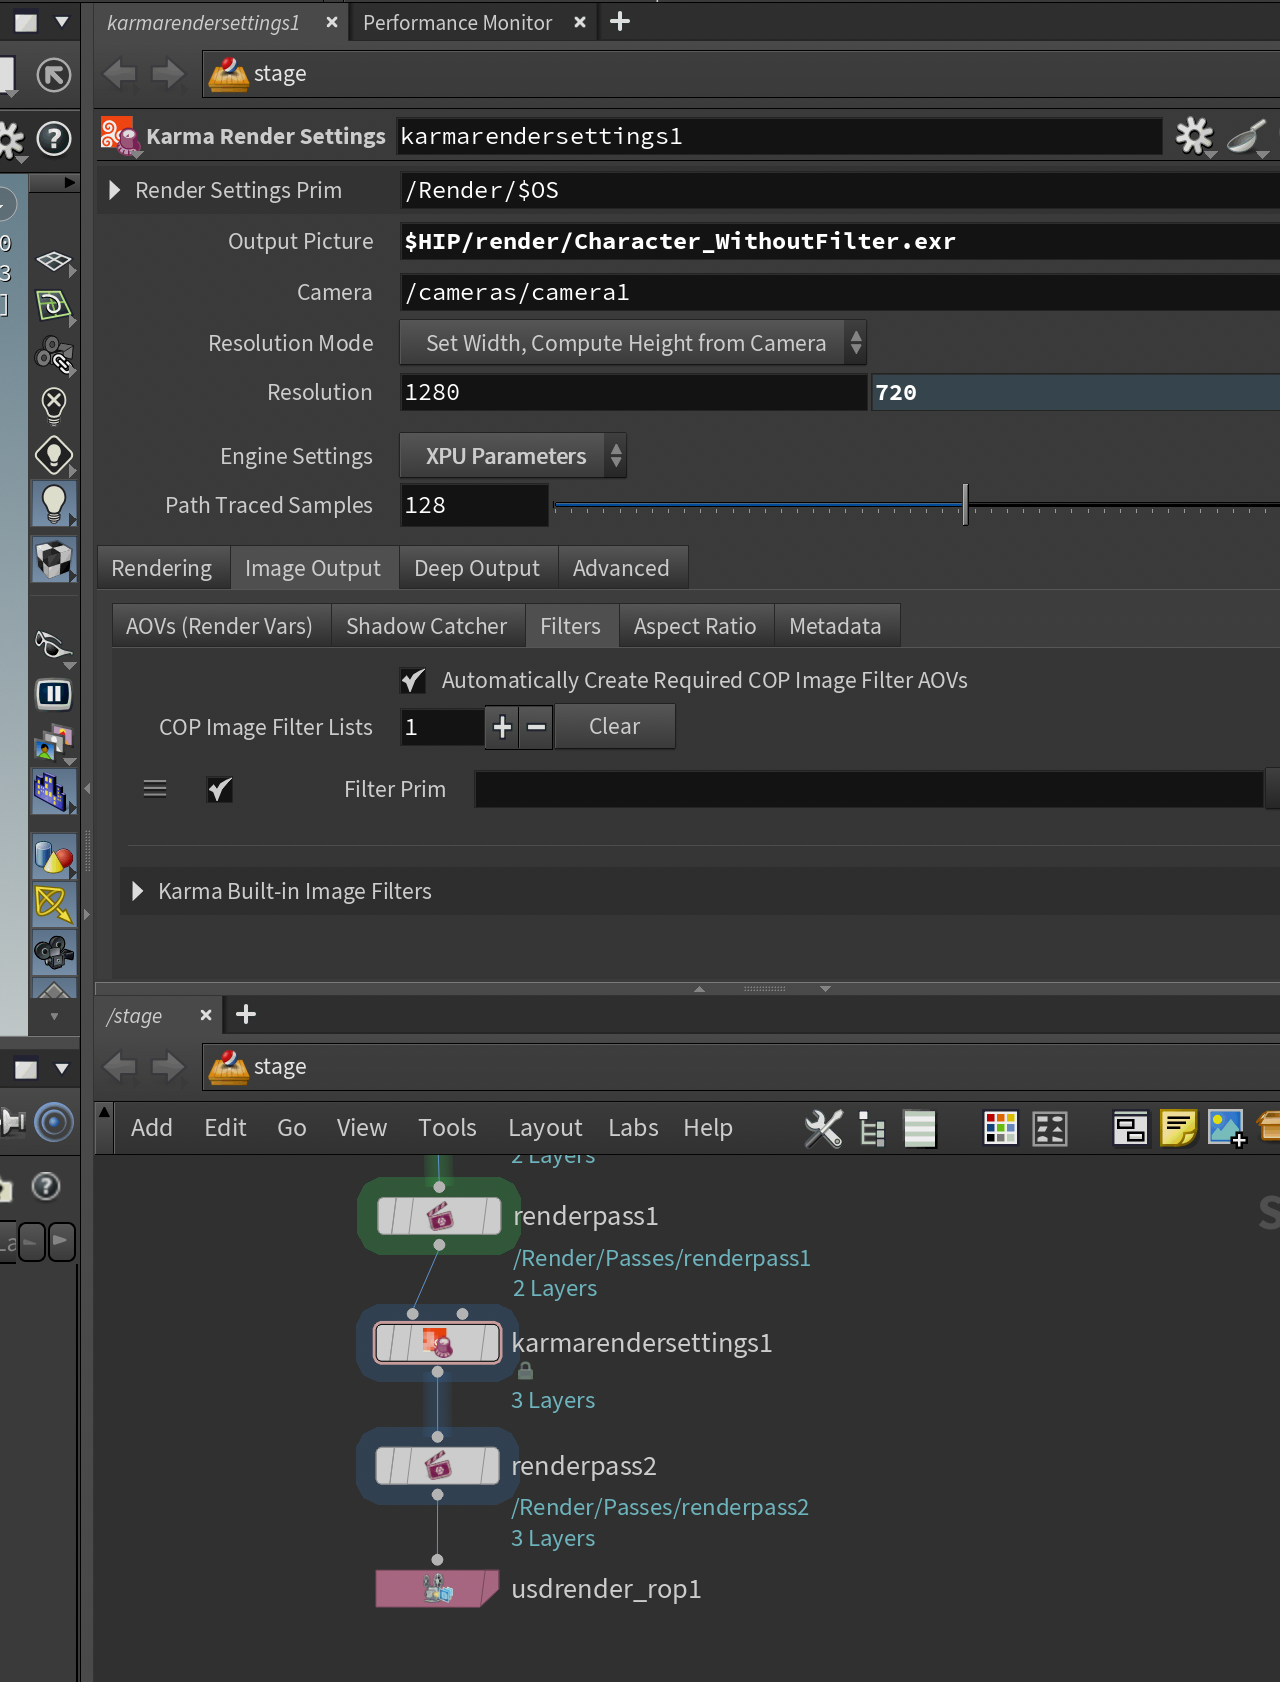
Add renderpass2 after this settings node. Set its Render Source to:
/Render/karmarendersettings1The second pass is authored at:
/Render/Passes/renderpass2Each pass now has a unique RenderPass prim, a unique Render Settings prim, and a unique output file.
Important: Never let two passes write to the same output path. One result may overwrite the other. For an animation, include a frame token such as
$F4in every output filename.
Step 4: Tell the USD Render ROP which passes to use
The Render Pass parameter on the USD Render ROP can target one or more RenderPass prims. The menu shows the passes available on the stage. Select an exact prim path when you want one pass, or use a scene graph pattern to include several passes.
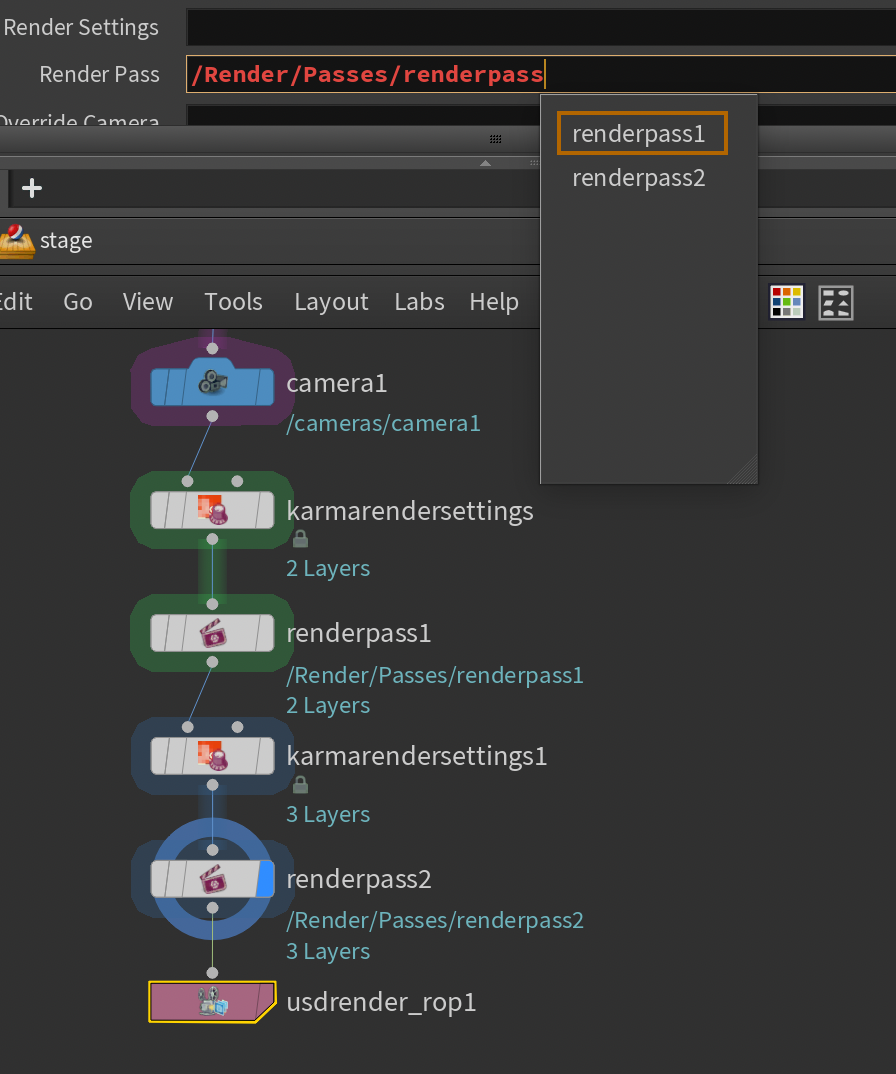
To include every pass created by this setup, use the wildcard:
/Render/Passes/renderpass*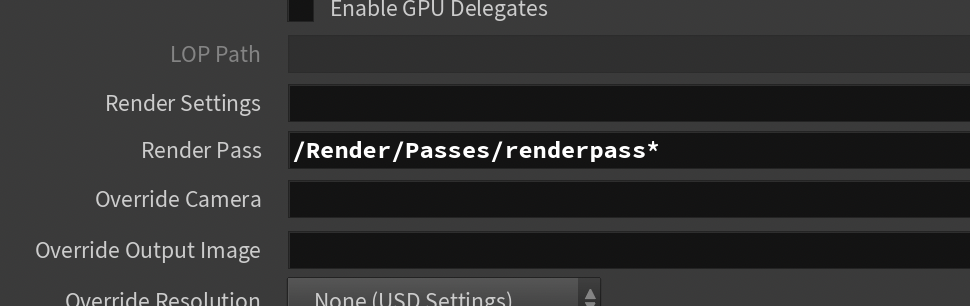
This matches renderpass1, renderpass2, and any additional pass that follows the same naming pattern.
In this example, the wildcard is what includes both the filtered and unfiltered versions in the same USD Render ROP. Houdini sends both RenderPass prims through that one ROP, while each pass follows its own Render Source and writes to its own output file.
If you only want to render one pass, select its exact prim path instead of using the wildcard.
Step 5: Connect the Drop & Render LOP
Connect both the USD Render ROP and the Drop & Render LOP to the output of the final Render Pass LOP.
For this example, both nodes branch from renderpass2:
renderpass2
    |\
    | usd_render_rop1
    |
    drop_and_render1
The Drop & Render LOP is a submission branch. It is not inserted between renderpass2 and the USD Render ROP.
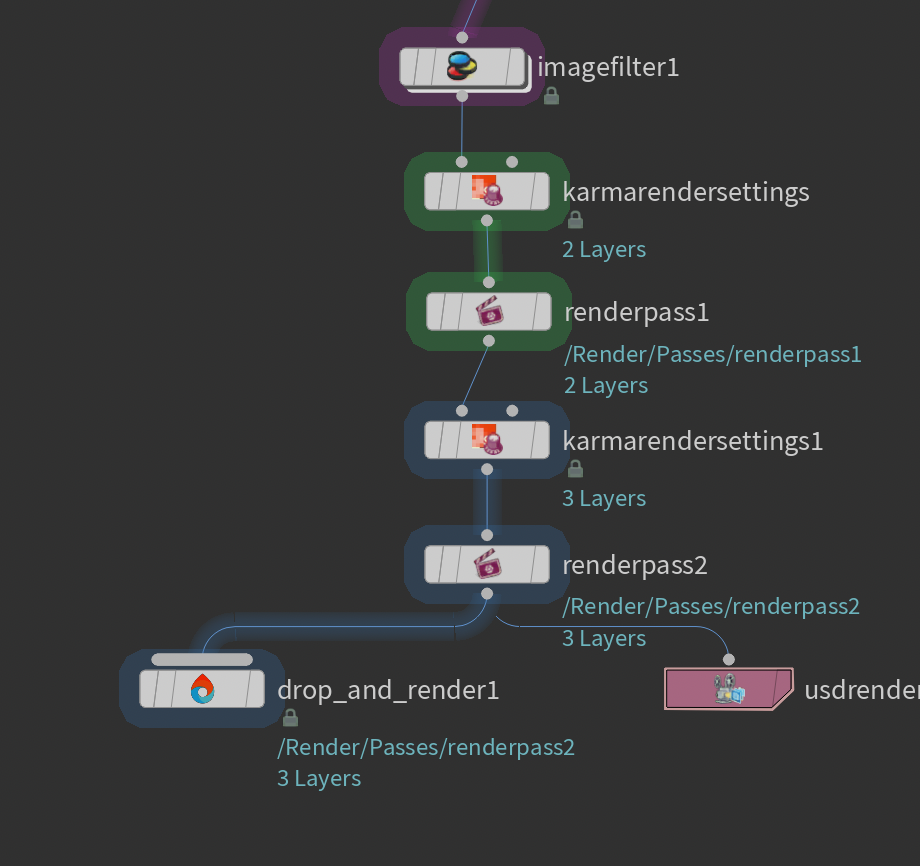
Connecting the plugin here gives it the completed USD stage containing both RenderPass prims and both Render Settings prims.
Step 6: Run Scene Check and submit
Open the Drop & Render node and run Scene Check.
For this two pass example, the Jobs tab should show two submissions:
renderpass1renderpass2
The Scene Check screenshot also shows both prims below /Render/Passes and both settings prims below /Render in the Scene Graph Tree.
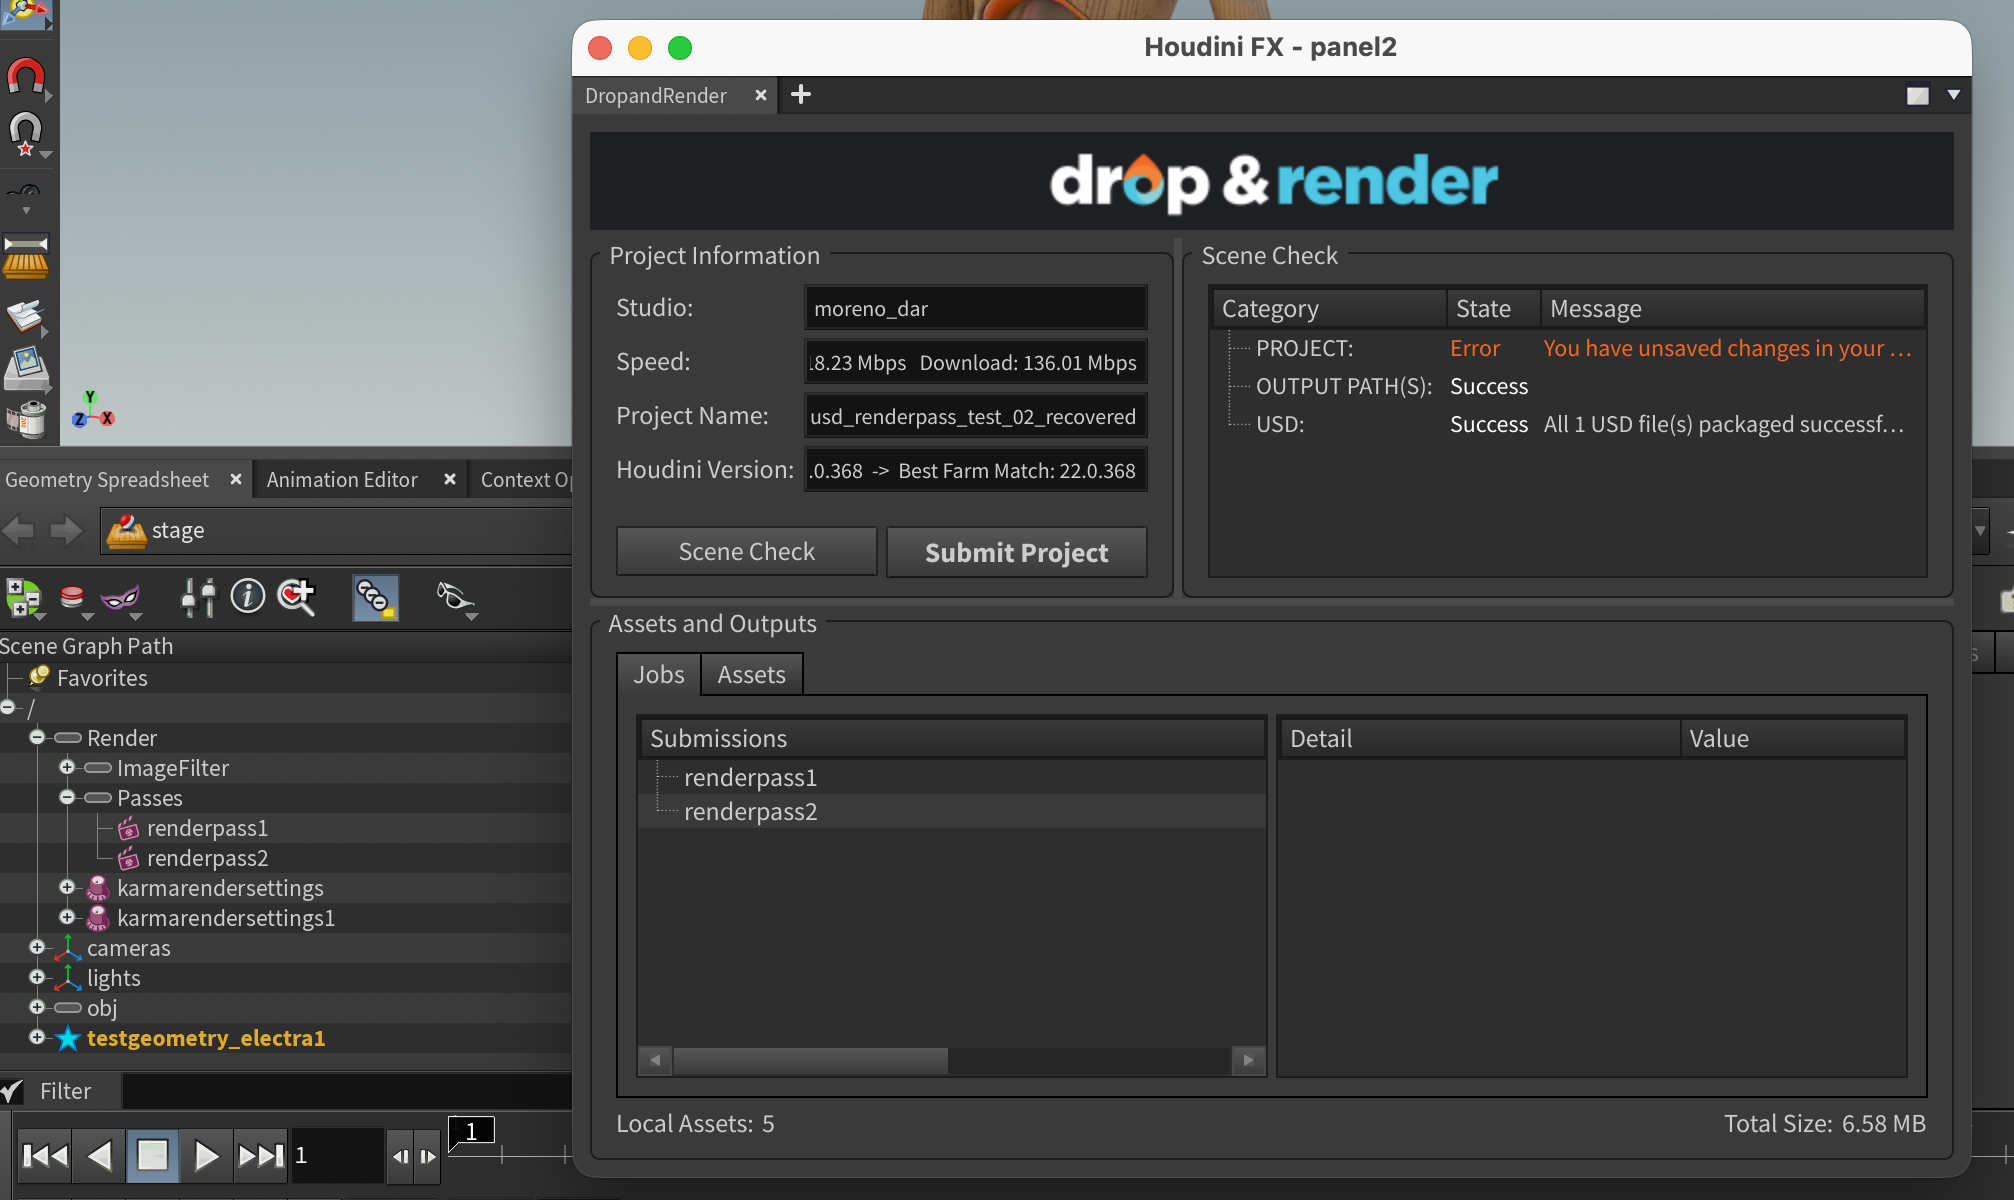
The example is matched to Houdini 22.0.368 on the farm. Scene Check reports successful output path and USD checks, but it also shows a project error because the scene contains unsaved changes.
Save the Houdini file and run Scene Check again before clicking Submit Project. The project check should no longer report an error.
After submission, Drop & Render creates one farm job for each detected RenderPass prim. The two passes render in parallel on different machines and can be monitored independently.
How Drop & Render picks up your passes
The plugin does not guess from node names or wiring. It reads your composed USD stage, the same data husk sees, and expands your render pass pattern against it. Wildcards work, multiple patterns work, parameter expressions work.
For each matched pass, the plugin follows the pass's Render Source relationship to find the Render Settings that drive it. Not the nearest settings node in the network, the actual settings prim the pass points to on the stage. We resolve it with the same priority order husk uses:
- A Render Settings override on the ROP
- The pass's own Render Source
- The stage default render settings
So when your filtered pass uses one Karma Render Settings node and your unfiltered pass uses another, each job renders with the right settings and delivers to the right output path. Camera, resolution, samples, AOVs, filename. Per pass, no manual work.
On the farm, each job is restricted to exactly its own pass before rendering starts, so nothing renders twice and no output gets overwritten.
Using object visibility in a pass
The image filter example shows that every pass can point to different Karma settings. The Render Pass LOP also provides object participation controls.
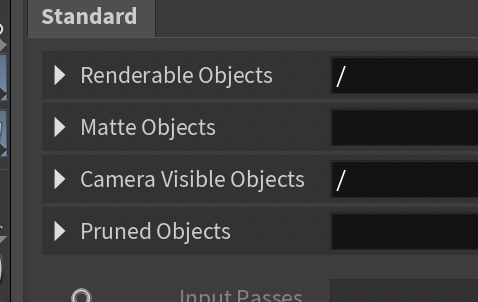
The Standard section contains:
- Renderable Objects: Defines which objects participate in the render
- Matte Objects: Makes selected objects render with zero alpha
- Camera Visible Objects: Controls direct camera visibility while objects may still affect other light paths
- Pruned Objects: Removes selected objects from the pass
These controls use USD primitive paths and collections. This lets you create passes for holdouts, isolated scene elements, or different visibility combinations without creating separate scene files.
Built for production setups, not demo scenes
Real studio scenes are rarely one ROP with two passes. The pipeline handles what production actually looks like:
Multiple USD Render ROPs on one stage. A common pattern is several ROPs sharing a LOP chain, each with its own frame range. We detect all of them, and jobs stay uniquely named. The first ROP keeps the clean pass names, further ROPs rendering the same passes get a short suffix like renderpass1-2.
Expressions and patterns. The render pass parameter can be a wildcard, a list of patterns, or driven by an expression. We evaluate it exactly as your scene does.
Your output paths stay yours. Every pass delivers to the output path of its own Render Settings prim, with your exact filenames and frame padding preserved. AOVs and Karma deep output included.
Nothing breaks. Passes only activate when the render pass parameter is set. Scenes without passes submit exactly as before, and older Houdini versions are unaffected. If a pass cannot be resolved, the plugin warns you during Scene Check and falls back to the classic single job workflow instead of failing your submission.
What the screenshots verify
The demonstrated workflow confirms:
- Multiple Render Pass LOPs can be chained in one Solaris network
- Every pass can reference a different Karma Render Settings prim
/Render/$OScreates unique settings prim paths when the node names are unique- Each pass in this setup has its own output path
- The USD Render ROP can select one pass or match several with a wildcard
- Drop & Render connects as a branch from the final Render Pass LOP
- Scene Check lists every detected RenderPass prim as a separate submission
- The USD and output paths are checked before submission
Current renderer support
This Render Pass submission workflow currently supports Karma. The screenshots show a Karma XPU setup.
Redshift does not yet support this workflow. Drop & Render can add Redshift support when its Houdini integration supports the same Render Pass system.
This builds on years of USD support
Render passes are the newest layer on a USD pipeline we have been building for a long time:
- USD Render ROP support in Solaris and ROP networks, with Karma CPU, Karma XPU, Redshift, and V-Ray
- Automatic output remapping that preserves your raw paths, frame padding, AOV structure, and Karma deep output
- Standalone rendering of written out USD files with husk through our DAR USD Render HDA, with render pass support coming there next
- Automatic scanning and packaging of USD dependencies: sublayers, references, payloads, and textures
- Dependency aware submissions, so caches cook before the renders that need them
Our team works with Solaris and USD every day, and as an official SideFX partner we update our pipeline tools alongside Houdini releases. When a new workflow lands in Houdini, our goal is simple: it should work on the farm the week you start using it.
Houdini 22 render pass FAQ
Does Drop & Render support Houdini 22 render passes?
Yes, natively. Every RenderPass prim matched by your USD Render ROP becomes its own farm job with the correct render settings, resolved through the pass's Render Source relationship.
How many Render Pass LOPs do I need?
This example uses one Render Pass LOP for each pass, named renderpass1 and renderpass2. A Render Pass LOP can create or edit more than one RenderPass prim, but using one node per pass makes the Render Source and output setup easier to inspect.
Does every pass need its own Karma Render Settings LOP?
Yes. Each Render Pass points to its own Render Settings prim. This lets every pass use a unique output path and different Karma parameters.
Do I need a separate USD Render ROP for every pass?
No. One USD Render ROP can match all pass prims with /Render/Passes/renderpass*.
Where should I connect Drop & Render?
Connect it as a branch from the final Render Pass LOP. Keep the USD Render ROP connected to that same final node.
Do I need to change my scene to render passes on the farm?
No. If your passes render correctly with husk locally, they render correctly on the farm. The plugin reads the same USD data husk does.
Do passes render in parallel?
Yes. Each pass is a separate job, so your passes render at the same time on different machines instead of sequentially inside one husk process.
What happens to my output paths?
Each pass delivers to the output path of its own Render Settings prim, with your exact filenames and frame padding preserved.
What if a pass has no Render Source?
The plugin resolves the stage default render settings, exactly like husk, and warns you during Scene Check so you can make it explicit.
Why does Scene Check show only one pass?
Confirm that every pass has a unique prim below /Render/Passes. Make sure the Drop & Render LOP is connected to the final LOP containing all of those prims. Then confirm that the scene graph pattern in the USD Render ROP matches every pass you want to render.
Why does Scene Check show a project error?
Save the Houdini scene and run Scene Check again. The screenshot in this guide shows the warning produced by unsaved changes.
Are Render Passes the same as AOVs?
No. A Render Pass selects a render recipe. AOVs are image data produced inside that render. Each pass can still have its own AOV configuration.
Try it on your own scene
In this example, one Solaris network and one USD Render ROP produce two versions of the same image: one that applies the filter authored by the Houdini 22 Image Filter LOP and one that does not. The same approach extends to other Karma settings and object visibility combinations.
The fastest way to see it is to run your own setup through it. Install the Drop & Render plugin, connect your USD Render ROP, and run a Scene Check. Your passes will be in the job list before you finish your coffee.
Start rendering with Drop and Render or reach out to our team if you want to talk through a studio pipeline. We do this every day.