The Drop & Render render farm API lets you build cloud rendering into your production workflow. Use dar, the command-line interface included with Link, from your terminal, scripts or studio tools. If you want a compatible AI assistant to use those render tools without shell access, connect it through the Model Context Protocol (MCP) extension.
Both approaches support Blender, Cinema 4D and Houdini. They use the same farm, account, render credits and priority tiers. There is no additional API or MCP extension fee; your AI client may have its own charges.
Should you use the CLI or MCP?
Think about who will run the next step: your script, or an assistant you are talking to.
| Your workflow | What to use | Why it fits |
|---|---|---|
| Nightly batches, studio tools or automatic processing after delivery | The CLI from your scripts | Your code sets the sequence, checks the results and handles failures. |
| Preparing a render request or checking a job through conversation | MCP with a compatible AI client | The assistant can use render tools without shell access. You configure approvals in the client. |
| An AI coding assistant that already has terminal access | The CLI directly | It can use the same commands without setting up an MCP connection. |
For example, a studio script could submit every shot in a sequence, check delivery and then start a review-video export. MCP is useful when you want to ask, “Find shot010 and tell me whether all its frames have downloaded,” or work through a new render request with your assistant.
MCP exposes the same dar command interface through a local connection to Link. Use a compatible client with Streamable HTTP support on the same computer. If the assistant is going to create render.json, it also needs its own local file-writing tools; the MCP extension provides render tools. Set your client to ask before submitting billable renders or changing jobs. The MCP setup guide explains the connection settings.
The steps below show the CLI workflow, from preparing one request to checking that your frames have arrived.
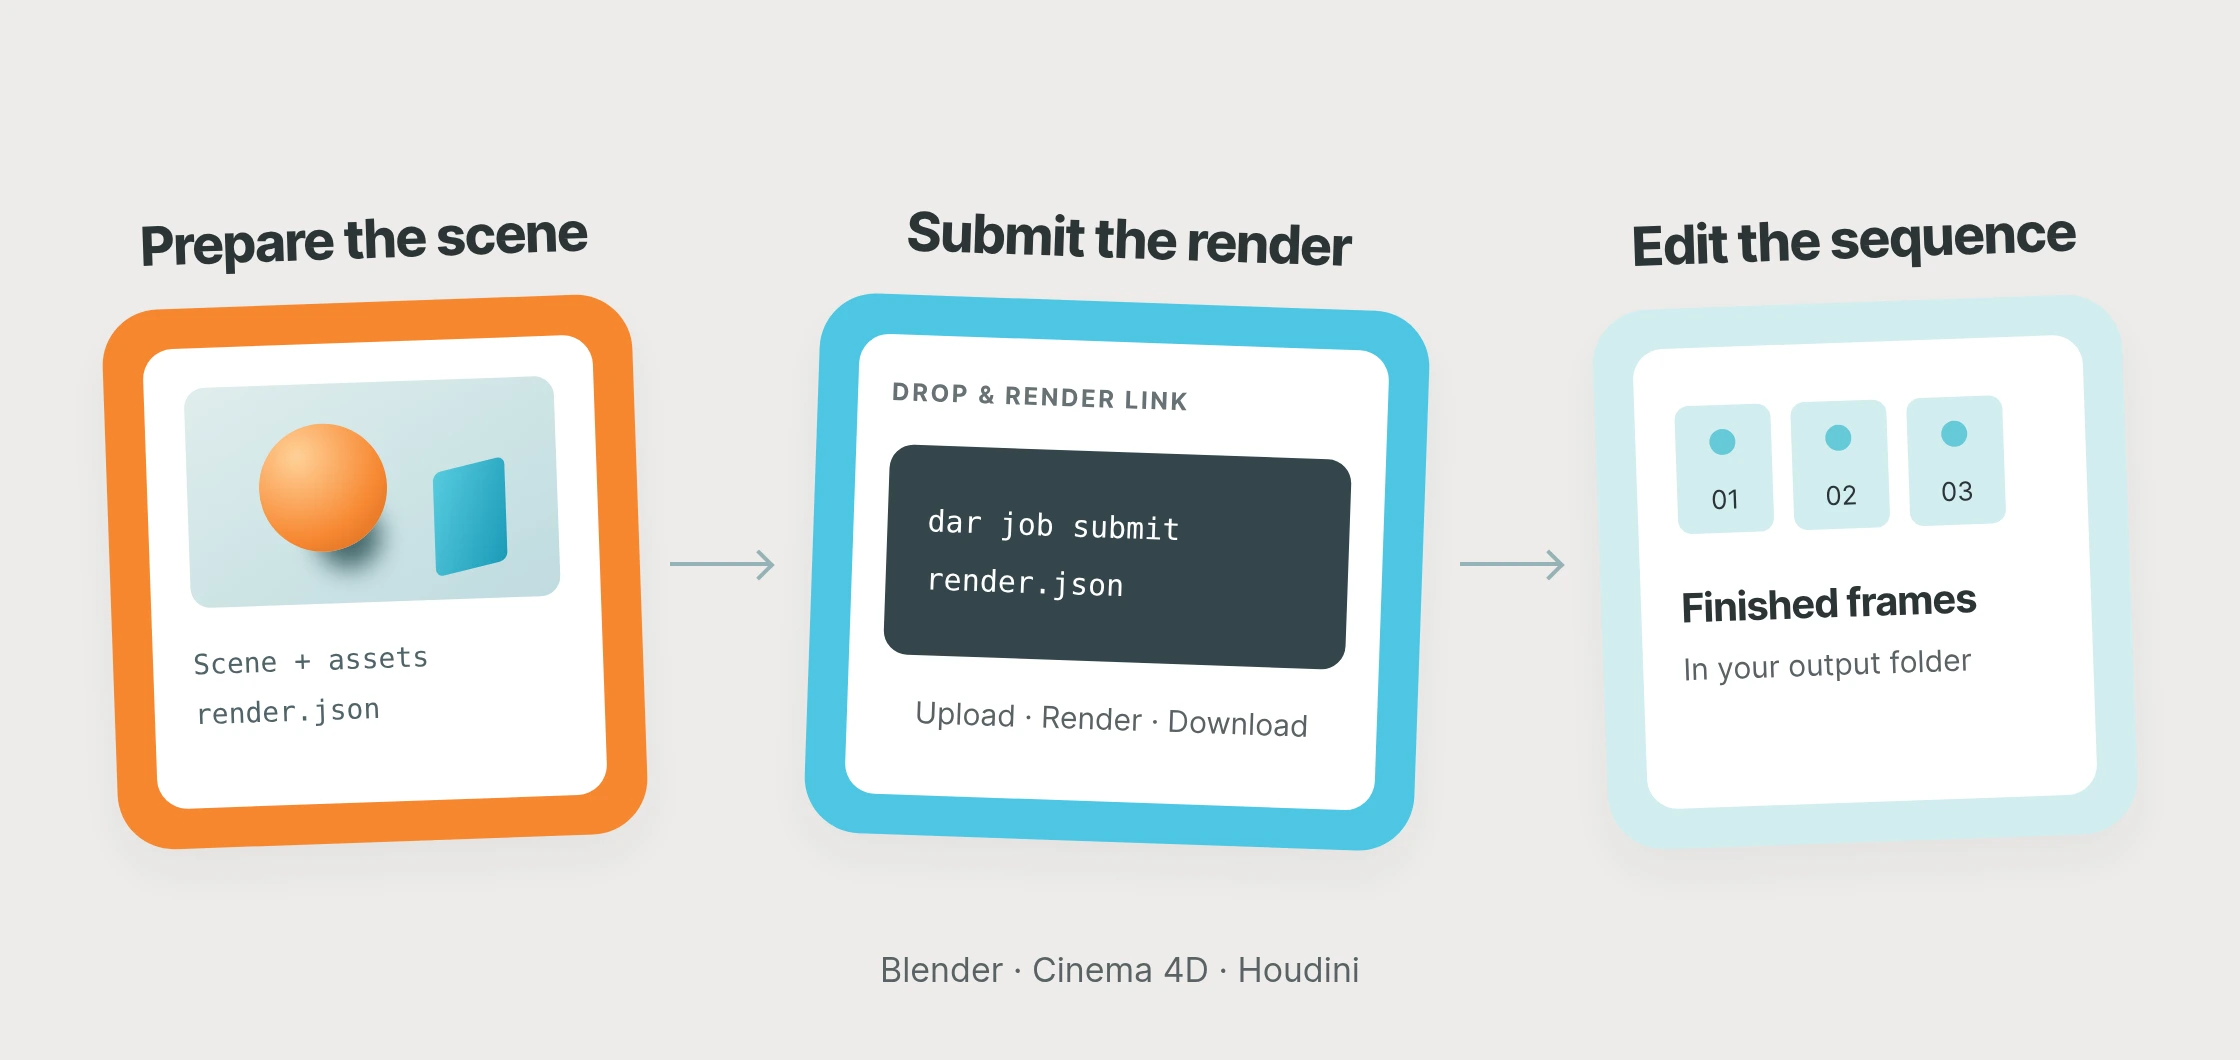
How do you prepare and validate a render request?
Install Drop & Render Link on the machine holding your project and sign in. Use the browser login for an interactive session, or supply your account credentials for an unattended workflow:
dar login
dar login "$DAR_STUDIO" "$DAR_USER" "$DAR_PASS"
Start the installed Link application, then open a new terminal and run dar status to check sign-in and service readiness before submitting. If your terminal cannot find dar, use the executable in your Link installation.
Save the scene with your camera, lighting and render settings, then describe the submission in render.json. List the required assets; you do not need to list the scene again, as it is included automatically. Write relative paths from the folder containing your JSON file, so you can run your submission script from another working directory without changing them.
Blender
Keep scene.blend beside render.json, with textures in textures and relative references saved in the scene:
{
  "application": "blender",
  "version": "4.5",
  "renderer": "cycles",
  "assets": ["textures"],
  "jobs": [
    {
      "name": "shot010",
      "scene": "scene.blend",
      "frames": {"start": 1, "end": 120},
      "output": {"directory": "renders/shot010", "format": "png"}
    }
  ]
}
Cinema 4D
Collect textures in tex, keep scene references relative and save the output format in the scene. This example uses the Standard renderer:
{
  "application": "cinema4d",
  "version": "2025",
  "renderer": "standard",
  "assets": ["tex"],
  "jobs": [
    {
      "name": "shot010",
      "scene": "scene.c4d",
      "frames": {"start": 1, "end": 120},
      "output": {"directory": "renders/shot010"}
    }
  ]
}
Houdini
For Houdini, you can keep assets in shared storage roots. Set their variables in the submitting environment and keep those references in the HIP:
export JOB=/shows/demo
export ASSETS=/library/assets
{
"application": "houdini",
"version": "20.5.613",
"renderer": "karma",
"studio": {"env": ["ASSETS"]},
"assets": ["$ASSETS/textures"],
"jobs": [
{
"name": "shot010",
"scene": "$JOB/scene.hip",
"render_node": "/stage/usdrender_rop1",
"frames": {"start": 1, "end": 120},
"output": {"directory": "renders/shot010", "format": "exr"}
}
]
}Link uploads the listed assets, preserves their layout beneath each root and remaps the root variables on the farm. Match application versions to your saved scene; third-party renderers also need renderer_version for the installed integration. Query farm builds with dar versions blender, dar versions cinema4d or dar versions houdini; add an application filter when checking a renderer, such as dar versions redshift --houdini 21.0.700. To check your local Link and service versions instead, run dar versions without a name. Use dar job prepare --help to look up the request fields as you build your JSON file.
Validate the request before creating a billable render:
dar job prepare render.jsonKeep your connection to the farm open while preparing the request, so you can validate it and check reused assets without creating a render job. Start with a short frame range, and keep commands that submit, cancel or requeue jobs behind your own approval step. Use --account with the identifier reported by dar status to reject an action if the account or farm has changed. This is a safety check, not an account selector or login credential.
Find shots by project
When you’re sending several shots to the farm, you can label them by project or department so they’re easy to find together later. Put the shared labels in the top-level labels object in render.json, then use jobs[].labels for anything specific to a shot.
For example, you could start with {"project": "atlas", "department": "lighting"} and give one job the override {"shot": "sh010", "department": null}. You can then find that job by project=atlas and shot=sh010; setting the department to null removes it from the inherited labels.
After submission, use the returned QID to read, set or remove labels:
dar job label <qid> project atlas
dar job label <qid> project
dar job get <qid>
dar job list --label project=atlas --label shot=sh010
dar job label <qid> --clear project
With both filters in the example, you’ll find only jobs that match project=atlas and shot=sh010 exactly, across all accessible jobs rather than just the current page. To remove a label, use --clear; passing an empty string keeps the key with an empty value.
If your submission creates take children, they receive the labels you supplied when submitting, even when the children appear later. You can edit their labels independently afterwards, without changes to the parent carrying over.
How do you submit a preview?
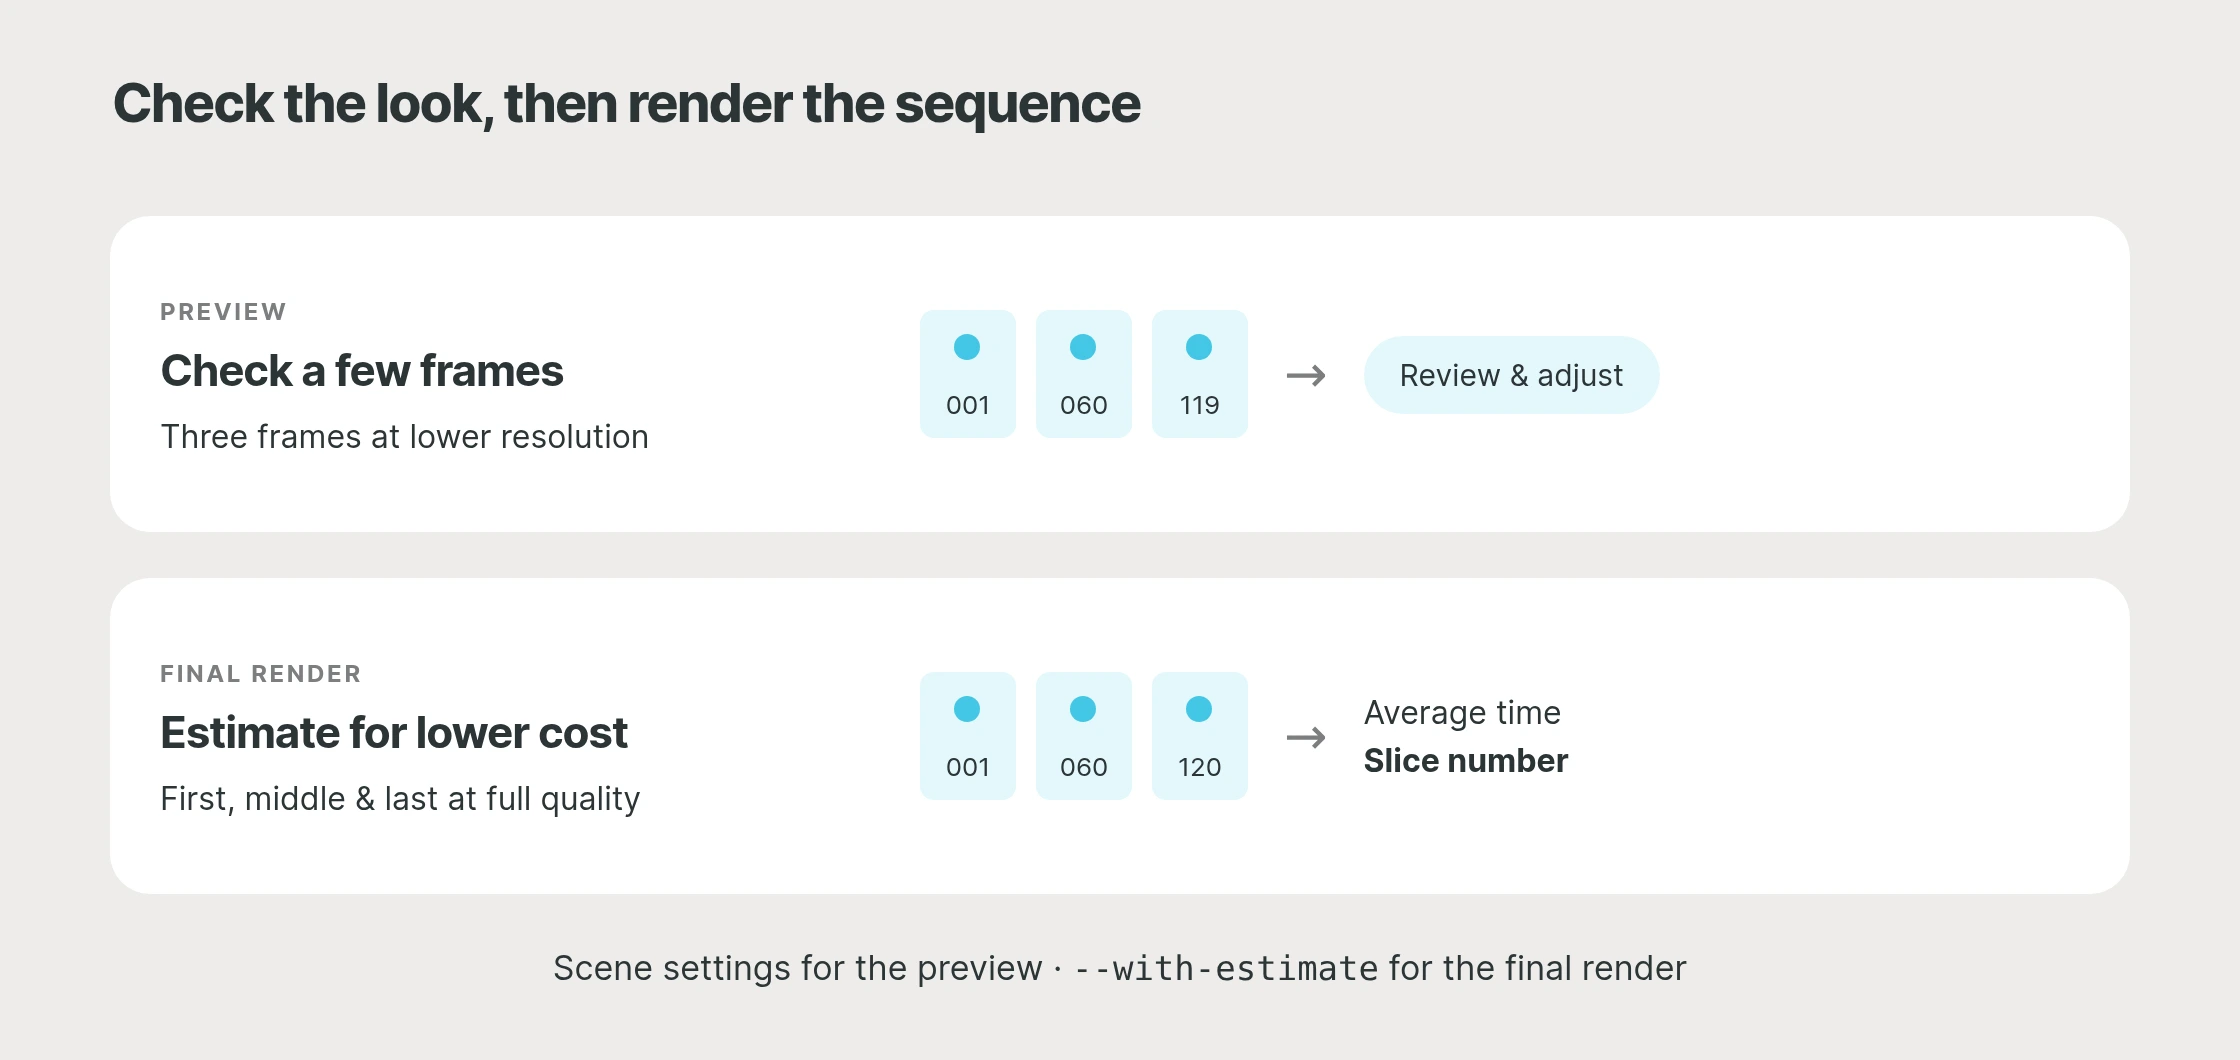
Make a separate scene copy with lower resolution and sample settings, then copy the request to preview.json. Point it at that scene, choose a short frame range and use renders/preview as the output folder. Submit with:
dar job submit preview.jsonThe command returns after the farm accepts the job. Keep Link running while it uploads the project and downloads the rendered frames. Use dar job status <job-id> to check both rendering and download progress. Once the preview has arrived, review the images and make any changes to your full-quality scene.
What does frame-grouping estimation do?
For independent image-render jobs with consecutive frames, Link can estimate how many frames to assign to each render slice:
dar job submit render.json --with-estimateIt renders the first, middle and last frames at full quality, then uses their average processing time, including startup, to choose the slice number. Grouping frames can reduce repeated scene-loading overhead. The samples are billable, downloaded and excluded from the remaining sequence, which submits automatically.
This estimates a cost-efficient frame grouping rather than a price quote. For previews, single frames, caches, single-machine jobs, dependent jobs or standalone USD, use dar job submit render.json directly. Estimation does not support frame exclusions. Our pricing page explains render credits and priority tiers.
How do you check that frames are delivered?
A successful submission returns job IDs after the farm accepts the request. Upload, rendering and frame delivery continue in the background. Keep the source files unchanged until upload finishes, and leave Link running to receive the output. In your script, read the JSON result from stdout and keep progress messages on stderr separate.
Submit the request, save the returned job ID, then use it to check progress. Replace your-job-id below with that ID:
dar job submit render.json
dar job status "your-job-id"
Before processing the files, check that the job has completed and that download progress has reached 100%. Your script should check again at intervals and handle failed or cancelled jobs, with a timeout so it does not wait forever. Stopping the script or closing the terminal does not cancel accepted farm work. To cancel a job, use dar job cancel <qid> with the returned QID. If a submission result is uncertain, inspect the existing jobs before trying again so you do not submit the same shot twice.
When a shot becomes urgent, read its current priority and allowed tiers before changing it:
dar job priority <qid>
dar job priority <qid> emerald
You can choose from the returned allowed_tiers, based on the job’s lease. Because changing priority can affect cost, you’ll be asked to confirm in an interactive terminal; for unattended scripts, keep that decision behind your own approval step. You’ll receive applied once the new tier is confirmed, or unchanged if the job was already at that tier. If you receive accepted, the change has been accepted but is not yet confirmed.
After acceptance, you can wait up to 30 seconds for confirmation or pass --detach to return without waiting. If you stop watching with Ctrl+C, the accepted change can still take effect, so check the job before trying again whenever the outcome is uncertain.
Once one shot works, you have a useful starting point for the next. Reuse the request in a nightly batch, add a submit button to a studio tool, or have your script start the next production step after delivery. Choose the CLI when you want your code to run a repeatable sequence. Choose MCP when you want to work through a compatible AI assistant. Both use the same farm, account and render credits.
For supported applications, more examples and job controls, visit the render farm API page. Use dar --help for the command reference that matches your installed version. If you prefer to prepare a shot or check a job through conversation, connect your AI assistant through MCP. You can also follow your jobs in Deadline 10 Monitor or submit Blender jobs through Flamenco 3.